How to Change a Tire Changing a tire might seem intimidating, especially if it’s your first time or if you find yourself stranded on the side of the road. But the truth is, it’s a skill every driver should master. With a few essential tools and some basic know-how, you can safely replace a flat tire and get back on the road in no time. This guide will walk you through the process, step by step, making it approachable for beginners and a good refresher for seasoned drivers.
Why Knowing How to Change a Tire Is Essential
A flat tire can happen anywhere—on a quiet country road, in heavy traffic, or even in your own driveway. Being stranded without knowing how to change a tire can quickly turn a minor inconvenience into a stressful situation.
First, learning this skill increases your independence and confidence as a driver. You won’t have to rely on waiting for roadside assistance, which can be costly and time-consuming. Imagine being able to solve the problem yourself while everyone else is stuck waiting.
Second, knowing how to change a tire improves your safety. Being stranded on a busy road is dangerous, especially at night or in bad weather. By quickly and efficiently swapping your tire, you reduce the time you spend in risky situations.
Finally, understanding the process can save you money. Towing services and tire shops can charge significant fees for a simple tire change. By handling it yourself, you keep your budget intact while learning a valuable life skill.
Tools You’ll Need Before You Start
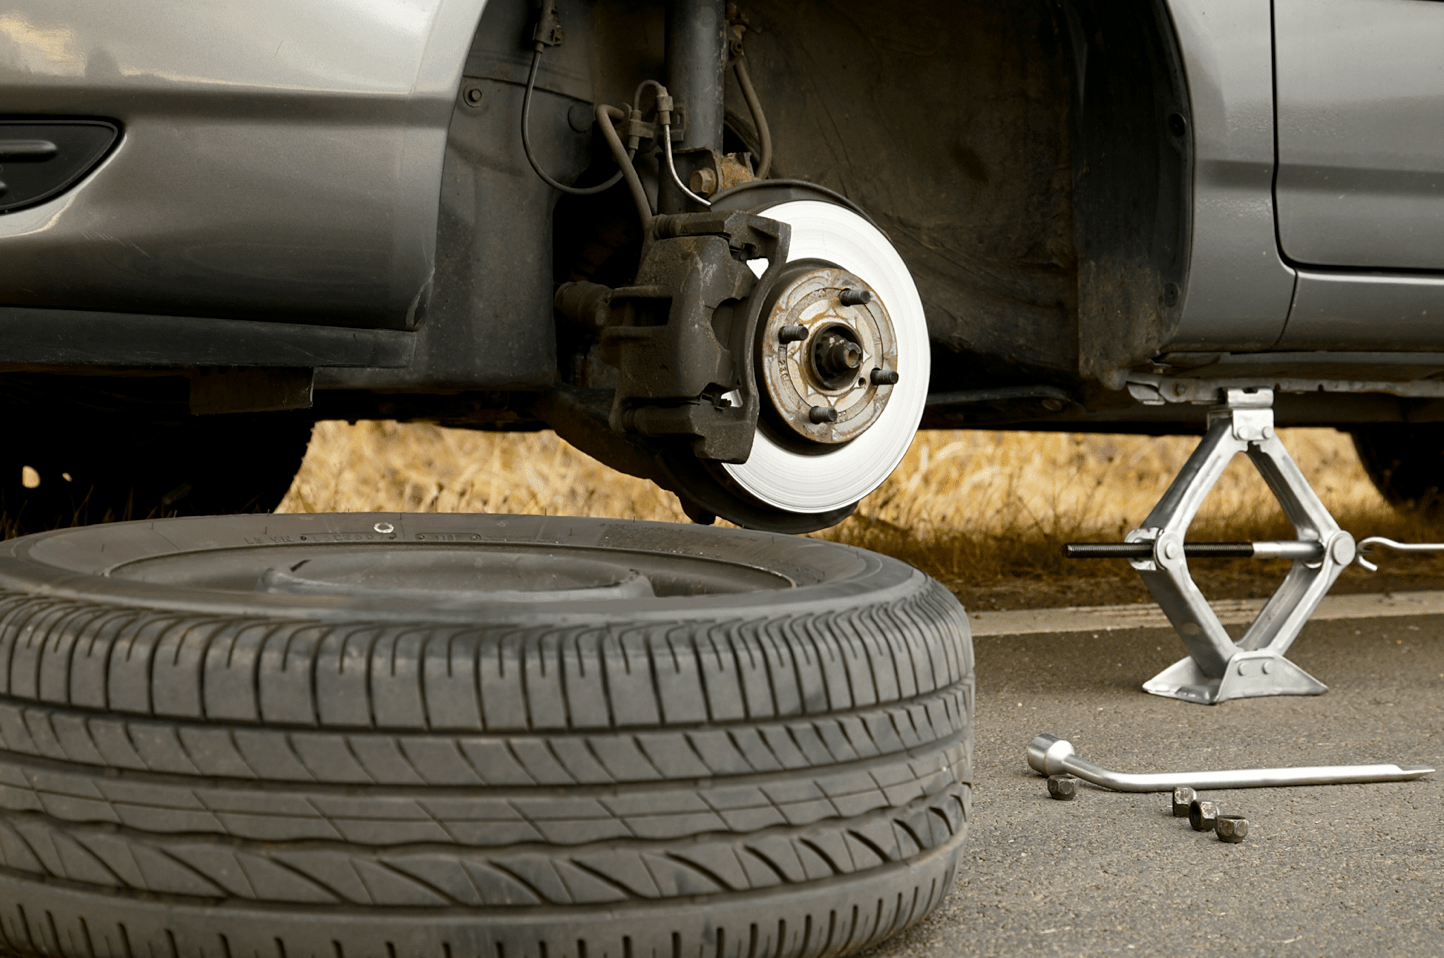
Before attempting How to Change a Tire, preparation is key. Having the right tools on hand ensures the process goes smoothly. Here’s what you should have in your car:
- Spare Tire – Always make sure your spare is properly inflated and in good condition. Many drivers forget to check the spare until it’s too late.
- Car Jack – This is crucial for lifting your vehicle off the ground. Make sure your jack is compatible with your car’s make and model.
- Lug Wrench – This tool loosens and tightens the lug nuts that secure the tire to your car. Some vehicles come with a combination jack and wrench.
- Wheel Wedges and Gloves – Wheel wedges How to Change a Tire prevent your car from rolling while lifted, and gloves keep your hands clean and safe.
Being fully prepared before you start saves time and reduces stress. Check your car manual for any specific instructions or safety warnings, as some vehicles have unique requirements for jacking points or tire removal.
Step 1: Preparing Your Vehicle
The first step in How to Change a Tire a tire is to ensure your car is in a safe, stable position. Safety should always be your priority.
Start by pulling over to a flat, solid surface, away from traffic if possible. Avoid soft ground or hills, as the car could slip or tilt during the process. Once stopped, turn on your hazard lights to alert other drivers.
Next, engage the parking brake. This keeps your car stationary while you lift it. If available, place wheel wedges behind or in front of the wheels opposite the one you’re changing. This extra precaution prevents the vehicle from rolling unexpectedly.
Finally, remove the hubcap or wheel cover if your car has one. How to Change a Tire This allows easier access to the lug nuts. Some hubcaps can be pried off with a flathead screwdriver or the edge of your lug wrench. Doing this before lifting the car saves you from fumbling around while it’s unstable.
Step 2: Loosening the Lug Nuts
Once the car is secured, it’s time to loosen the lug nuts. This step is essential because it’s much safer to do while the car is still on the ground How to Change a Tire.
Use the lug wrench to turn each nut counterclockwise. You may need to apply significant force, so brace yourself and ensure the wrench is securely positioned on the nut. If it’s too tight, a little extra leverage can help—stand on the wrench or use a cross wrench if available.
It’s important to loosen the nuts slightly rather than removing them entirely. Fully unscrewing them while the car is lifted can be dangerous, as the wheel may spin or slip. Loosening them first ensures a smoother and safer process once the car is raised.
Step 3: Lifting the Vehicle with the Jack
With the lug nuts loosened, How to Change a Tire time to lift your car. Placing the jack in the correct position is critical to avoid damaging your vehicle or injuring yourself.
Consult your owner’s manual to find the recommended jack points—these are reinforced areas of the frame designed to handle the car’s weight. Position the jack firmly under this point and begin lifting the vehicle. Raise it until the flat tire is about 6 inches off the ground, giving enough clearance to remove the tire.
During this step, check that the car remains stable. Avoid putting any part of your body under the vehicle while it’s lifted. Safety first! If the jack wobbles or seems unstable, reposition it immediately.
Step 4: Removing the Flat Tire
Now comes the main event: removing the flat tire.
Start by completely unscrewing the loosened lug nuts. Place them in a safe location so you don’t lose them. Gently pull the tire straight off the wheel hub. It may be a little stuck if it has been on the car for a long time, so give it a firm wiggle to free it.
Set the flat tire aside and inspect the wheel for any visible damage. How to Change a Tire Sometimes debris or corrosion can affect the new tire’s fit, so it’s worth a quick check before installing the spare.
Step 5: Installing the Spare Tire
Installing the spare is straightforward, but requires attention to detail.
Align the spare tire with the lug bolts, making sure it sits flush against the hub. Push it onto the bolts gently until it is fully in place. Begin threading the lug nuts onto the bolts by hand, turning them clockwise. Hand-tightening first ensures that the nuts are correctly aligned and prevents cross-threading.
Once the nuts are hand-tightened, use the lug wrench to snug them further. How to Change a Tire Don’t fully tighten them yet; the final torque will be applied once the car is lowered.
Step 6: Lowering the Vehicle and Tightening the Lug Nuts
With the spare in place, carefully lower the car using the jack. Make sure the vehicle is fully supported on the ground before applying full pressure to the lug nuts.
Tighten the lug nuts in a crisscross or star pattern. This ensures even pressure and a secure fit. Avoid tightening them in a circular sequence, as it can lead to uneven torque and a wobbly wheel.
After all the nuts are snug, double-check each one. This is crucial for safety and ensures the spare won’t come loose while driving.
Step 7: Final Checks and Tips
After changing the tire, there are a few final steps to ensure everything is safe.
Check the tire pressure on your spare. Many spares, especially compact “donut” tires, require higher pressure than regular tires. How to Change a Tire Drive cautiously and avoid high speeds until you can replace the spare with a full-size tire.
Store your tools and flat tire properly. If the old tire is damaged, arrange for repair or disposal as soon as possible. Keep the lug wrench and jack accessible for future emergencies.
Finally, review your work. Make sure all nuts are tight, the jack is removed, and nothing is left around the wheel. A quick visual inspection goes a long way in preventing accidents.
Conclusion
Changing a tire doesn’t have to be stressful. With the right tools, a step-by-step approach, and a focus on safety, you can handle a flat tire like a pro. Remember, preparation is key—check your spare and tools regularly, and always follow safe procedures How to Change a Tire.
By mastering this essential skill, you gain confidence, save money, and ensure your safety on the road. Next time a flat tire happens, you won’t panic—you’ll know exactly what to do.